This detailed explanation takes you through every step that you have to take to add Google Analytics to your WordPress website…
How to set up a Google Analytics 4 and add it to your WordPress website using Google Tag Manager
There are a few steps to adding Google Analytics to a WordPress site but it’s reasonably simple to do. The aim of this tutorial is to take you step-by-step, through creating your Google Analytics account, creating a Google Analytics 4 Propert& Stream, and then adding the Measurement ID to your WordPress website using Google Tag Manager & the Woody Ad Snippets plugin.
- Create/make sure you have a Google account
- Sign in to your Google Account
- Go to: https://analytics.google.com
- Set up a Google Analytics 4 property account for your site within the Google Analytics Admin area
- Set up Google Tag Manager
- Log in to your WordPress website
- Add Woody ad snippets plugin to your WordPress website
- Add Google Tag Manager tracking code to ‘Woody snippets’
- Create and add a Tag in Google Tag Manager & then Publish It
Step 1: Create a Google Account
Please note: If you already have a Google account, you can skip Step 1 and Go to Step 2
- Type: www.google.co.uk into the address bar of your web browser.
- Click on blue ‘Sign In’ button to the top right of the Google home page.
- Click on the ‘Create account’ link and then choose the option that you want your Google account for. If you don’t know, just choose the ‘For myself’ option.
- Enter your first and last names and then enter the email address that you’d like to have. You may find the address you want has already taken so keep trying until you find a suitable one that Google will let you have.
- Enter a password that is secure but that you will remember. (TIP: Combinations of Numbers, Symbols, Lower and Uppercase characters make your passwords more secure)
- Once you have filled in all of the details that Google requires, click on the blue ‘Next’ button.
- Enter a mobile telephone number (optional), a recovery email address (also optional), and your date of birth and gender.
- Click on the blue ‘Next’ button once you’ve provided Google with the details it requires.
- Enter the 6-digit verification code into the box if you received it or click on ‘Not Now’ if you didn’t receive the verification code.
- Agree to Google’s Terms of Service and agree to the processing of your information as described in the Privacy Policy and then click on the blue ‘Create Account’ button.
- If you’re taken to a screen that shows “As a manager, you can add your business to Google for free” then simply click on the blue ‘Not Now’ link.
- You should then be taken to Google’s home page with you logged into the new account that you’ve just set up.
Step 2: Sign in to your Google Account
Please note: If you are already signed in to your Google account, you can skip Step 2 and Go to Step 3
- Type: www.google.co.uk into the address bar of your web browser.
- Click on the blue ‘Sign in’ button to the top right of Google’s home page. If it doesn’t show the blue ‘Sign in’ button then you may already be logged in so skip to Step 3.
- Enter your email address into the box and then click on the blue ‘Next’ button.
- Enter the password for your Google account and then click on the blue ‘Next’ button.
- That’s it: You’re no logged into your Google account and can go to Step 3.
Step 3: Go to https://analytics.google.com

- Type: analytics.google.com into the address bar of your web browser.
- Click on the blue ‘Start measuring’ or ‘Start for Free’ button in the middle of the page.
Step 4: Set up a Google Analytics 4 property account for your site within the Google Analytics Admin area
- You should be at the https://analytics.google.com/
- Please Note: If you already had another Google Analytics account and are logged in, then it’ll display your Google Analytics Admin Dashboard like this:

- Click on the cog at the bottom left of the screen and then click on the blue ‘+ Create Account’ button and this will take you to the account setup page below:

-
- Enter the name you want to give to your Analytics account (this could just be the name of your business or website’s name and then once you’ve chosen exactly what you want to share with Google and then scroll down and click on the blue ‘Next’ button. You should then be presented with this screen:

-
-
- Give your Google Analytics Property a name, choose the country and timezone you’d like to report in, select the currency you’d like to use in your reports and then click on the blue ‘Next’ button at the bottom. You’ll then be taken to the ‘About your business’
-
-
-
- In the Industry category your organisation is in, select how big your organisation is, and then check the boxes that best describe how you intend to use Google Analytics. Once you’ve done that scroll down and click on the blue ‘Next’ button to be taken to the Google Terms of Service Agreement below:
-

-
-
- Once you’ve agreed to the Google Analytics Terms of Service agreement and the Additional Terms Applicable to Data Shared with Google boxes then simply click on the grey ‘I Accept’ button at the bottom to be taken to the Google Analytics 4 Data Stream Set-Up Section
-

-
-
- Select whether you want the source of your Google Analytics data to come from either an iOS app, an Android app or choose ‘Web’ as you want to collect data from a website. Next, you’ll be taken to the ‘Set up data stream’ area where you’ll be presented with these options below:
-

-
-
- Important: The https:// to the left of the Website URL textbox is clickable and is a dropdown menu, so if you need to change to http:// because your site doesn’t use an SSL certificate, then click on the https:// button and select http://
- Enter the domain name that you’re going to add Google Analytics to and then give the stream a name such as ‘Company Name Website’ for example. Then click on the blue ‘Create stream’ button to be taken to the ‘Webstream details’ section.
- Click on the blue ‘Create stream’ button and you’ll be taken to the ‘Webstream details’ section below:
-

-
-
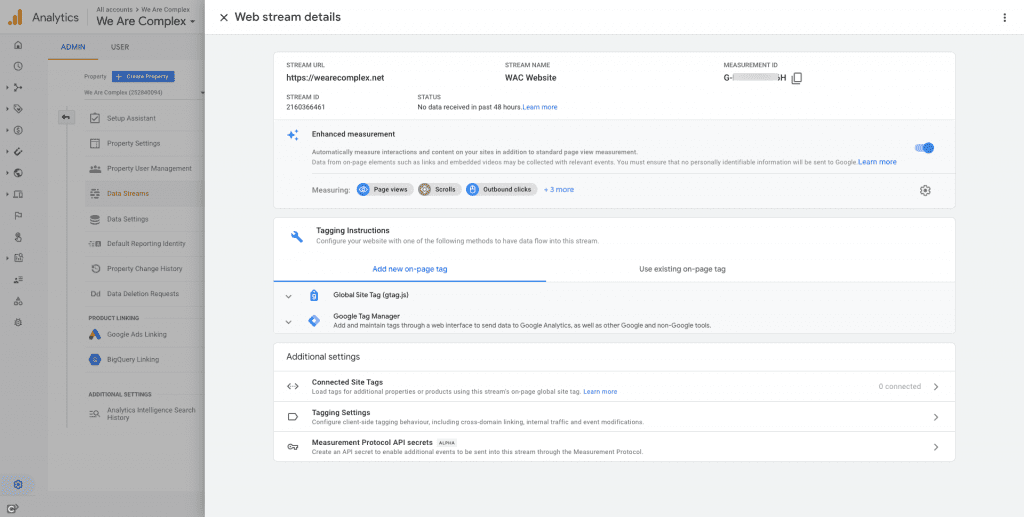
- This section provides you with the details and code you need to add the Google Analytics tracking code to the site using Google Tag Manager including the measurement ID (which you will need later so I recommend that you make a note of the Measurement ID to use later) that is used in the setup of Google Tag Manager later
-
Step 5: Set up Google Tag Manager by going here: https://tagmanager.google.com/

-
-
- First, click on the grey ‘Create account’ button and you’ll be taken to the ‘Add a New Account’ section of Google Tag Manager as shown above and then agree to the Google Tag Manager Terms of Service Agreement as shown below:
-

-
-
- Simply enter a name for your account, select the correct country, add a container name and select the ‘Web’ options from the list of different options it gives you below the container setup. Then click on the blue ‘Create’ button and then you’ll be taken to the Google Tag Manager Terms of Service Agreement:
-

-
-
- Agree to the Google Tag Manager Terms of Service Agreement by checking the ‘I also accept the…’ checkbox and then click on the blue ‘Yes’ button to the top right of the page. You’ll then be taken to a screen that gives you the Google Tag Manager Container code to add to your site:
-

-
-
- We highly recommend keeping this page open in your browser tabs so that you have easy access to Google Tag Manager container code!
-
Step 6: Log in to your WordPress website
-
-
- In a new web browser tab, go to your WordPress website’s login page and log in to your site.
- If you have the login details but don’t have the full login URL then it’s usually a case of adding ‘/wp-admin’ to the end of your domain name. For example, www.mywebsitedomainname.co.uk/wp-admin
-
Step 7: Add Woody ad snippets plugin to your WordPress website.
-
-
- When you’ve logged in and are being shown the WordPress Dashboard, hover over the ‘Plugins’ item in the navigation on the left and click on ‘Add New’.
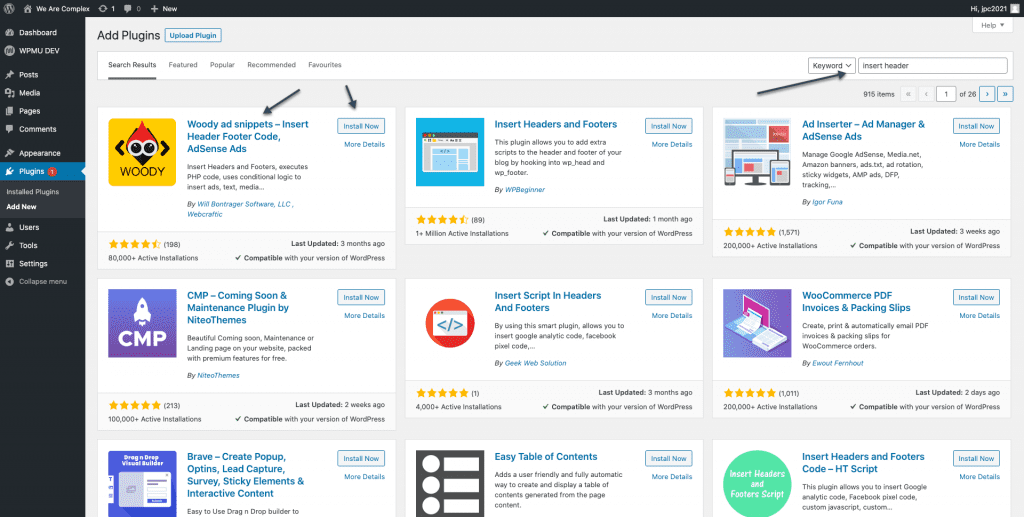
 This should take you to the Add Plugins page with an Upload Plugin button, and then a box with: ‘Featured, Popular, Recommended, Favourites’ with a search box to the right of them like it appears below:
- When you’ve logged in and are being shown the WordPress Dashboard, hover over the ‘Plugins’ item in the navigation on the left and click on ‘Add New’.
-

-
-
- Click inside the ‘Search plugins…’ box and search for the plug-in we want to install which is: ‘Woody ad snippets – Insert Header Footer Code, AdSense Ads’ but you only need to search for ‘insert header’ to find it usually so enter that into the search and press the enter or return button (depending on the computer you’re on).
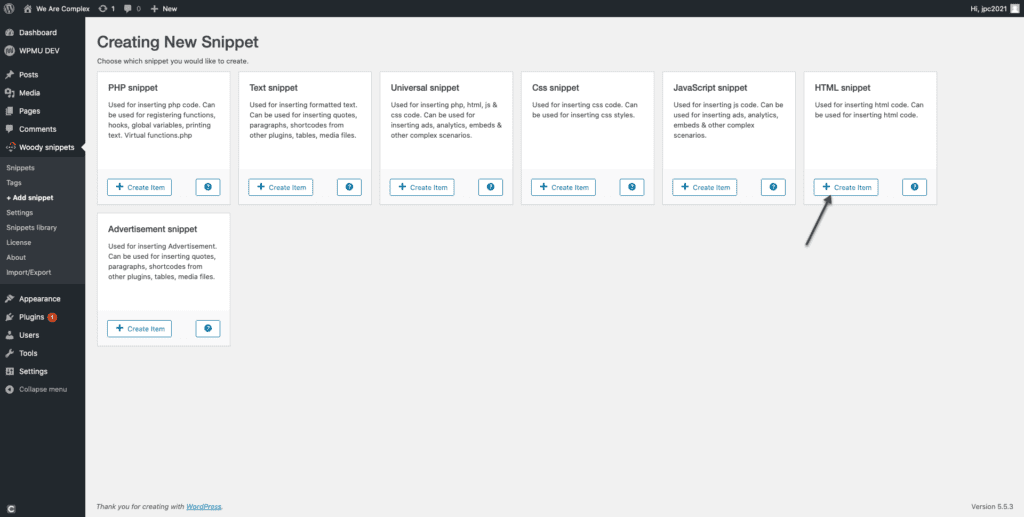
- A selection of plugins will appear below the search box and hopefully, one of them will be the ‘Woody ad snippets’ and now you should click on the ‘Install Now’ button below the ‘Woody ad snippets’ text. Then once it has installed, click on the blue ‘Activate’ button. This will redirect you to the ‘Woody ad snippets’ page and you now need to click on ‘+ Add snippet’ from the sidebar navigation in WordPress as shown below:
-

Step 8: Add Google Tag Manager tracking code to ‘Woody snippets’ > + Add snippet > HTML Snippet
-
-
- Once you’ve clicked on the ‘+ Add snippet’ in the side navigation and have chosen to add an HTML snippet then there are four things that you need to add or change:
-

-
-
- Once you’ve clicked on the ‘+ Add snippet’ in the side navigation and click on the ‘Create Item’ button in the ‘HTML Snippet’ box to create a new HTML snippet. Once you have chosen to add an HTML snippet then there are four things that you need to add or change:
-

-
-
- Give the Snippet a name that accurately describes the Snippet so we’ve gone for ‘Google Tag Manager (HEAD)’ so that we also know where this code is going to be placed.
- Next, go back to the Google Tag Manager and the container you created. There are two parts to the Google Tag Manager container code and you need to copy the top part of the code using the copy button in the top right of the code box.
- Go back to Woody snippets that you’re working and paste the code you’ve just copied from Google Tag Manager and into the code area of the Add snippet page.
- Next, in the Woody Snippets ‘Base options’ is a setting that asks: ‘Where to execute the code?’ and you should make sure that ‘Automatic Insertion’ is highlighted blue and if not click on it to highlight it.
- Still, in the Base options, make sure that on the ‘Insertion location’ setting is displaying ‘Head’. If it’s not then clicking on the box next to the bold ‘Insertion location’ text and select ‘Head’ from the dropdown options.
- Make sure that all of your settings are set up like in the image above this section:
- Once all the settings are as displayed in the screenshot above, click on the blue ‘Publish’ button in the right sidebar.
- Next up, you’ll need to repeat this process of the second part of the Google Tag Manager container code which will need to be placed in the footer this time so click on Woody snippets > + Add snippet and click on the ‘Create Item’ button in the ‘HTML Snippet’ box to create a new HTML snippet again.
- This time, you need to give your Woody HTML snippet a name and we’ve called ours ‘Google Tag Manager (BODY)’
- Again, go back to the Google Tag Manager page with container codes on it but this time click on the copy button the bottom section of code.
- Paste the code you’ve just copied into the code area in the new Woody HTML snippet that you’ve just created.
- Again make sure that ‘Automatic insertion’ is highlight blue in the Base options settings and that the ‘Insertion location’ is set to ‘Insert Before Post’.
- When you’re sure that all of the settings look like the screenshot below, click on the blue ‘Publish’ button in the right sidebar and that’s it bar one more thing!
-
-
-
- Finally, click on Woody snippets > Snippets to double-check that the Snippets page is showing the two HTML snippets that you’ve just created and that their toggle is active.
-
Step 9: Create and add a Tag in Google Tag Manager
-
-
- In your web browser, go to back to the Google Tag Manager page that gave you the GTM code snippets and click the ‘OK” button. If for some reason you don’t still have the Google Tag Manager page still open then click on this link: tagmanager.google.com/ and select the account you just created so that you’re viewing the Workspace area for this account which should look something like this::
-

-
-
- Now you need to click on the ‘Add a new tag’ button within the New Tag box and you’ll be taken to this page:
-

-
-
- A new section should slide in and next to where the cross is, it should have an ‘Untitled Tag with a folder icon to the righthand side of it. Delete ‘Untitled Tag’ and replace it with a name for your tag so for this example I’m going to call it ‘GA4 Tag’. Once you’ve done that you can now click on the white on grey tag icon in the Tag Configuration section of the page and this should display a new section like this:
-

-
-
- Choose: ‘Google Analytics: GA4 Configuration’ from the Featured section and then go to your Google Analytics page that I recommended you make a note of earlier and enter that measurement ID into the Measurement ID box.
- Next click on the blue Save button in the top right of the screen and it’ll flag up a ‘No Triggers Selected’. A trigger is simply an event that does something when something happens. So in this instance, we want the GA4 tag code to be displayed on page view. So with the ‘No Triggers Selected’ box, click on the blue ‘Add trigger’ link to add a trigger to your tag and this will slide the ‘Choose a Trigger’ section into view like in the screenshot below:
-

-
-
- Click on the ‘All Pages’ row and then if configured correctly your ‘GA4 Tag’ should look like this:
-

-
- Now click on the blue ‘Save’ button in the top right and that will now automatically add your GA4 Tag to the Google Tag Manager container and is set to be triggered and tracked every time a user visits a page on your WordPress website.


